Wiring a light switch is a fundamental task in residential electrical work, but it must be done safely and correctly to avoid electric shocks, short circuits, or fire hazards. This guide explains how to wire a standard single-pole light switch using UK wiring practices, though the principles apply broadly.
1. Safety First
Before any electrical work, turn off the power at the consumer unit (fuse box) and confirm with a voltage tester that the circuit is dead. Never rely on just switching off the light at the switch itself. Use insulated tools and, if unsure at any point, consult a qualified electrician.
2. Understand the Components
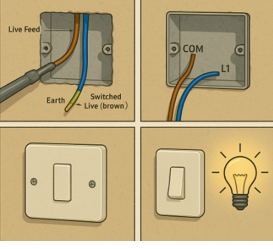
A basic light switch has two terminals (Common and L1), and sometimes a third (L2) for two-way switching. The wiring involves three main types of wires:
- Live (Brown) – carries current from the power source
- Neutral (Blue) – completes the circuit back to the source (not connected to the switch in simple setups)
- Earth (Green/Yellow) – safety wire that should always be connected to the back box and metal faceplates
3. Tools and Materials Needed
- Insulated screwdriver
- Wire strippers
- Voltage tester
- Light switch
- Back box (if fitting new)
- 1.0mm² or 1.5mm² twin and earth cable (depending on circuit rating)
- Electrical tape or wago connectors for safe wire termination
4. Wiring a Single-Pole Light Switch
In a typical loop-in ceiling wiring system (common in UK homes), the switch only interrupts the live wire. Here’s how to wire it:
- Power Off and Preparation
Ensure the circuit is dead. Remove the old switch if replacing one. Pull out the wires from the back box and take note of how they were connected. - Identify the Wires
You will usually see two or more brown wires (live feed and switched live). The brown cable coming from the ceiling rose or junction box is usually the live feed. The brown cable going to the light is the switched live. - Connect the Terminals
- Common (C): Connect the live feed wire here.
- L1: Connect the switched live wire here (going to the light fixture).
- L2: Leave empty unless it’s part of a two-way switching circuit.
If the brown wire used for the switched live was originally blue (from a twin and earth cable), it should be sleeved in brown insulation to indicate it’s live.
- Earth Connections
Connect all earth wires (green/yellow) together and to the metal back box using the earthing terminal. Also connect to the switch faceplate if it’s metal.
5. Secure and Test
After wiring:
- Double-check connections are tight and correct.
- Ensure no copper is exposed beyond terminals.
- Carefully fold wires back into the back box and screw the switch into place.
- Restore power and test the switch. If it doesn’t work or trips the circuit, turn off power and check for wiring mistakes.
6. For Two-Way Switching
In two-way switching (e.g., for hallway lights with two switches), the switch will use C, L1, and L2. You’ll need three-core and earth cable, and wiring between switches involves traveller wires between L1 and L2, with live connected to C.
7. Final Checks
- Use a voltage tester to confirm correct function and absence of stray voltage.
- If the switch plate is metal, test that it’s properly earthed.
- Replace any damaged cables or accessories.
- Label the circuit at the consumer unit if newly installed.
Conclusion
Wiring a light switch is a manageable task for those with basic electrical understanding, but safety must always come first. If you’re ever unsure about wiring standards or techniques, especially with more complex configurations like two-way or dimmer switches, consult a qualified electrician. Done correctly, wiring a light switch improves both safety and convenience in the home.
Recent Comments