Understanding the Importance
Before drilling, it’s essential to know what lies beneath the surface. Walls can conceal live electrical wires, water pipes, gas lines, and other hidden services. Accidentally drilling into any of these can lead to electric shock, flooding, gas leaks, or costly repairs. A cable detector—also known as a stud finder, wire detector, or multifunction detector—helps identify hidden objects and reduces the risk of accidents.
Types of Cable Detectors
There are several types of cable detectors:
- Magnetic Detectors: Identify metal objects like screws or nails.
- Electronic Stud Finders: Detect changes in wall density to locate studs and wiring.
- Multifunction Detectors: Detect wood studs, metal pipes, and live electrical wires.
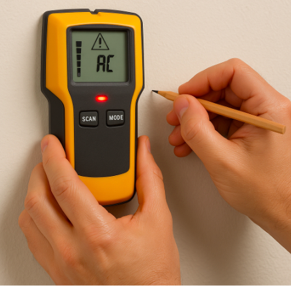
- AC Voltage Detectors: Specifically detect the electromagnetic field around live cables.
For drilling purposes, a multifunction cable detector is most useful as it can distinguish between metal, wiring, and structural components.
Step-by-Step Guide to Using a Cable Detector
1. Read the Manual
Before using the device, carefully read the instruction manual provided by the manufacturer. Each model may operate slightly differently, and understanding its features is key to accurate detection.
2. Check the Wall Type
Cable detectors work differently on plaster, drywall, concrete, or tile. Make sure your device is suitable for the type of wall you’re scanning. Adjust the settings accordingly if your detector has wall-type modes.
3. Turn Off Interfering Devices
Switch off nearby electronics or lights, and unplug any nearby appliances to reduce electrical interference. This helps ensure the detector picks up only the hidden wires behind the wall.
4. Calibrate the Detector
Most detectors need calibration before use. This is usually done by placing the detector on the wall and pressing a calibration button while keeping it still. Follow the on-screen prompts or LED indicators. Calibrate away from any obvious fixtures (e.g., near outlets or switches) to ensure a clean reading.
5. Scan the Wall Slowly
- Hold the detector flat against the wall.
- Move it slowly and steadily across the surface.
- Watch for visual or audio cues—beeps, flashing lights, or screen indicators.
The detector will alert you when it senses metal or live wiring.
6. Mark the Hazard Zones
When the detector identifies a hidden object, use a pencil to lightly mark the wall. Make several passes to confirm the object’s location and shape. This helps ensure you don’t accidentally drill into it from another angle.
7. Double-Check with Multiple Passes
Make multiple passes, both horizontally and vertically, to map out the hidden elements more accurately. Some cables may run diagonally or be looped in ways that a single pass can miss.
8. Avoid Drilling Near Marked Areas
Once you’ve identified and marked all hidden cables and objects, choose a safe location well clear of those zones for drilling. It’s generally advisable to avoid drilling directly above or below wall outlets, as cables often run vertically between them.
Safety Tips
- Use caution near outlets and switches, as cables typically run vertically or horizontally from them.
- Always assume a cable is live unless you’re absolutely certain it’s not. Turning off the circuit breaker before drilling provides extra safety.
- Use insulated drill bits if you suspect there might still be hidden wires, just as an added precaution.
- Keep the detector’s batteries charged—low power can result in inaccurate readings.
Conclusion
Using a cable detector before drilling is a simple but vital safety step. By following the proper procedure—reading instructions, calibrating the device, scanning carefully, and avoiding marked areas—you can prevent serious accidents and damage. This small precaution can save time, money, and potentially even your life.
Recent Comments