Tools and Materials Needed:
- Double socket outlet
- Back box (surface-mounted or flush)
- Electrical cable (typically 2.5mm² twin and earth for ring mains)
- Cable clips
- Wire strippers
- Screwdrivers (flathead and Phillips)
- Voltage tester or multimeter
- Pencil and spirit level
- Hammer and chisel (for flush mounting)
- Drill with masonry bits (if mounting on brick/concrete)
- Electrical tape
- RCD (Residual Current Device) for safety
Step 1: Planning and Safety
Before beginning, switch off the main power supply at the consumer unit (fuse box). Use a voltage tester on nearby sockets to confirm there is no live power. Plan your socket’s location — it should be at least 450mm above the floor (in new builds, per UK Building Regulations) and in a place convenient for use.
Step 2: Choosing Mount Type
You’ll either mount the socket flush (recessed into the wall) or surface-mounted (box sits on the wall).
- Flush Mounting: Requires cutting into the wall to install the back box.
- Surface Mounting: Easier; the box is screwed directly onto the wall.
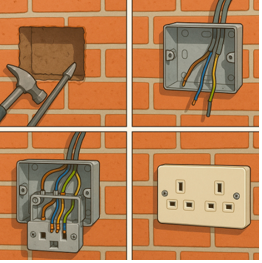
Step 3: Install the Back Box
For Flush Mounting:
- Mark the outline of the back box on the wall using a pencil and level.
- Chisel or cut out a neat hole in the wall.
- Drill holes and insert wall plugs for fixing screws.
- Feed the electrical cable through the entry hole in the back box, then screw it into place.
For Surface Mounting:
- Screw the surface box directly to the wall at the marked spot.
- Use cable trunking if necessary to hide cables.
Step 4: Running the Cable
Run 2.5mm² twin and earth cable from the existing ring main or the consumer unit (if it’s a new spur or circuit). The cable should be clipped securely and follow safe routing zones (horizontal or vertical from sockets or switches).
If you are adding a new socket to a ring main, ensure:
- The cable joins the circuit at two points (in and out).
- It complies with load limits and electrical regulations.
Alternatively, for a spur, connect it to a fused connection unit (FCU) with a 13A fuse.
Step 5: Wiring the Socket
- Strip about 10–12mm of insulation from each conductor (live, neutral, earth).
- Insert the brown (live) wire into the L terminal.
- Insert the blue (neutral) wire into the N terminal.
- Insert the bare copper (earth) wire into the E (or ⏚) terminal. Use green/yellow sleeving if not already present.
- Tighten all screws firmly, ensuring no copper is exposed and wires are secure.
For a double socket, both sides are internally linked, so only one set of connections is needed.
Step 6: Final Checks and Testing
- Fit the socket front to the back box and screw it in.
- Double-check all connections.
- Turn the power back on at the consumer unit.
- Use a socket tester or multimeter to verify proper wiring and operation.
Step 7: Safety and Compliance
- Ensure that your installation meets local electrical regulations.
- All new circuits or significant additions in the UK must be Part P compliant and notified to your local authority unless done by a certified electrician.
- An RCD is required for safety, especially in kitchens, bathrooms, or outdoors.
Conclusion
Installing a double socket from scratch is a manageable DIY task for those with basic electrical knowledge. It involves careful planning, correct wiring, and strict adherence to safety practices. When in doubt, always seek professional help — electricity is not something to take chances with.
Recent Comments